Button Versions and Features
MSI: Compatible with Outlook Desktop for Windows.
XML: Compatible with Outlook Desktop for Windows, Outlook Web App, New Outlook.
Google Workspace: Compatible with Gmail, Mobile.
Outlook Reporter Button Integration: Compatible with Outlook Desktop, Outlook Web App, New Outlook, Mobile.
PHISH ALERT for Exchange Server (on-premises) - MSI:
✓ Threat Triaging
✓ Mailbox Threat Removal
✓ Dynamic Folder for Reported Emails
X Mobile Support
✓ Can Report NINJIO Simulations
PHISH ALERT for Microsoft 365 - XML:
✓ Threat Triaging
✓ Mailbox Threat Removal*
✓ Dynamic Folder for Reported Emails
X Mobile Support (In Progress)
✓ Can Report NINJIO Simulations
Outlook Reporter Button Integration (Defender Required)
✓ Threat Triaging
✓ Mailbox Threat Removal*
X Dynamic Folder for Reported Emails
✓ Mobile Support
✓ Can Report NINJIO Simulations
PHISH ALERT for Google Workspace:
✓ Threat Triaging
X Mailbox Threat Removal
X Dynamic Folder for Reported Emails
✓ Mobile Support
✓ Can Report NINJIO Simulations
Feature Details
Threat Triaging: Admins can inspect and categorize the threat level of each reported email.
Mailbox Threat Removal: Rules can be created and customized within the NINJIO Platform to remove reported emails from the inboxes of all employees.
NOTE: MSI Rules created on the platform will affect all users. MTR may only be used for the MSI or the XML. MTR may not be used for both buttons simultaneously.
* An admin will need to create an Entra application for Mailbox Threat Removal to work with the XML button.
Dynamic Folder for Reported Emails: A custom inbox within Outlook whereby if a reported email is deemed "safe" it will go back into the user's inbox.
NOTE: Email Scanning is currently still in development and may be an additional license. The XML button is not currently compatible with shared mailboxes.
Minimum Requirements (MSI)
1. Windows 7 or higher.
2. VSTO - .Net Framework Version 4.7.1 (or higher).
3. Supported Outlook versions:
• 2010 > SP2, Minimum version 14.0.7261.5000 or higher.
• 2013 > SP1, Minimum version 15.0.5301.1000 or higher.
• 2016 > Version 2002 (Build 12527.20242) or higher.
• 2019 > Version 2002 (Build 12527.20242) or higher
Required Resources (MSI)
1. Visual Studio 2010 Tools for Office Runtime.
2. Net Framework 4.7.1 or higher.
XML Button Deployment
2. Log in to your Microsoft 365 Admin Center and head over to the add-ins page.
3. Click + Deploy Add-in and click Next.
4. Under Deploy a custom add-in, click Upload custom apps.
5. Under "Choose how to upload the add-in", click Choose File next to I have the manifest file (.xml) on this device and select the file and click Next.
6. Assign users to Everyone and leave the Deployment method as Fixed (Default). Then click Next
7. Accept permissions by clicking Save. You will need to login to an admin account with global admin access to do this.
8. Wait for the confirmation message to appear: "Your add-in has been deployed."
Note: It will take up to 72 hours for the add-in to be displayed on users' ribbons - users might need to relaunch Microsoft 365. If you'd like to have emails move to different folders after they've been reported, please follow NINJIO's Mail Threat Removal integration guide.
MSI Button Deployment
For the MSI button, please reach out to support@ninjio.com.
Outlook Report Messages Button Integration
Please follow the steps below to integrate the NINJIO platform with the Outlook Reporter button.

1. Within Defender, go to User Reported Settings, make sure the settings below are selected.
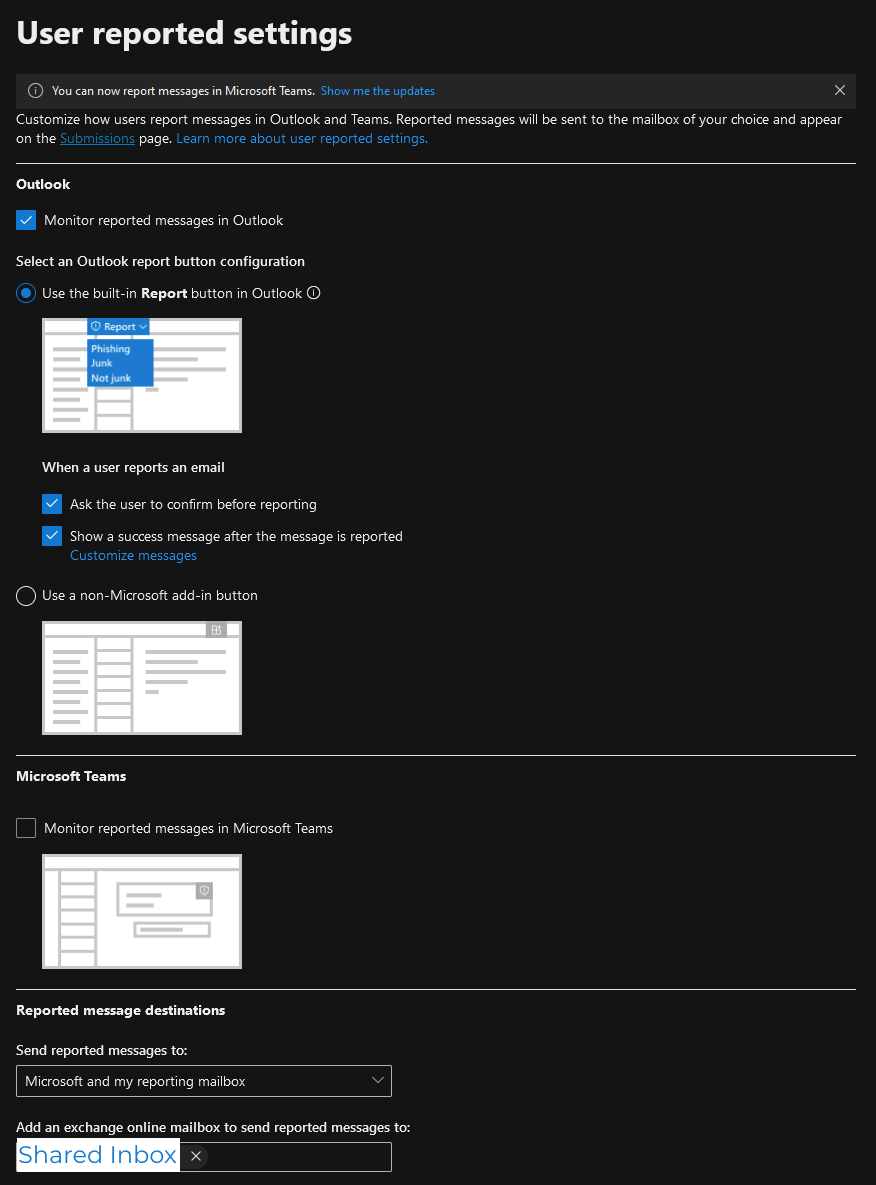
If you do not have one already, please create a shared inbox dedicated to receiving reported emails.
The shared inbox will need to be selected within "Add an exchange online mailbox to send reported messages to:".
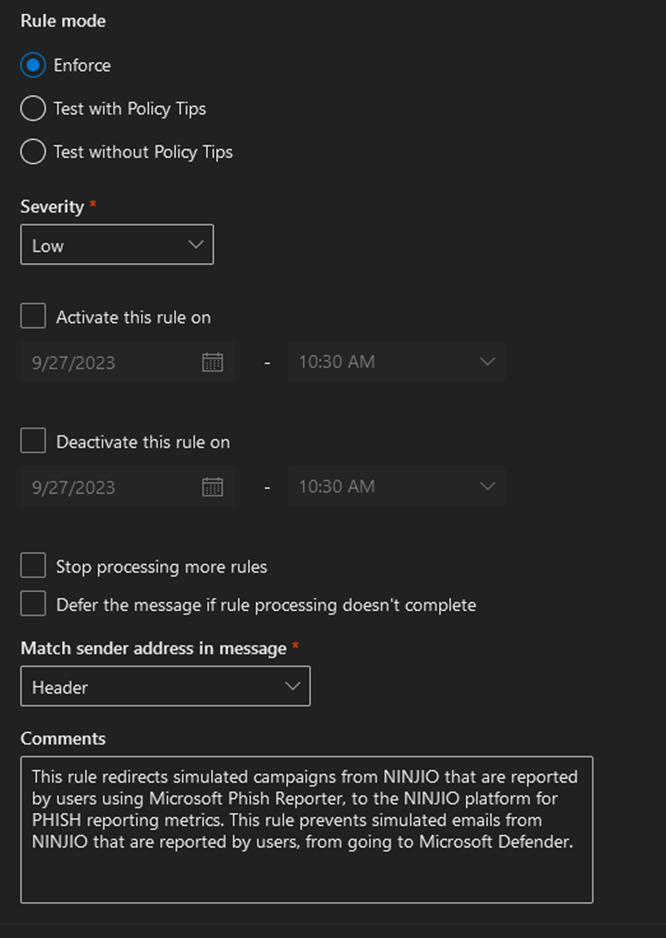
2. Create a mail flow rule in Exchange that will direct emails to the platform.
A. Under "Apply this rule if", select "The recipient" & "is this person"
B. For the recipient, select the same dedicated inbox you selected in the previous step.
C. (Optional) If you only want reported simulations sent to the platform, add the condition below.
Click the + button on the right of "Apply this rule if" and configure your new condition to have "The subject or body includes any of these words".
You'll need to put our NINJIO SMTP IP(s) within brackets and next to a "client-ip=",
e.g. [1.1.1.1] & client-ip=1.1.1.1
If you do not have this IP, please email support@ninjio.com.
Please note: If email redirection is enabled, reported emails may not remain in the shared inbox.
If you would like the shared inbox to retain a copy of reported emails, adjust the “Do the following” settings using the configurations below.
Google Workspace Button Deployment
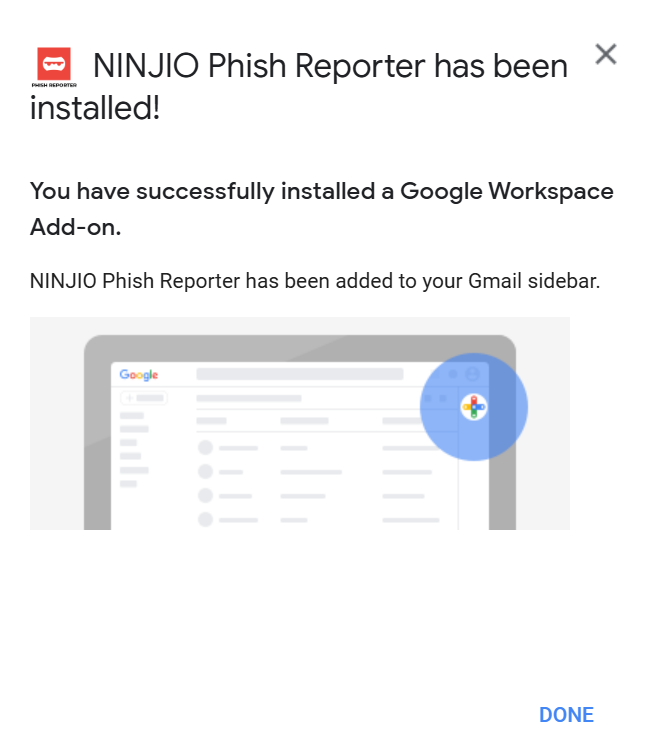
1. Log in as an administrator and install the NINJIO Phish Reporter from the Google Workspace Marketplace.

2. A prompt will indicate the button may take up to 24 hours to appear. Click Continue.
3. Choose the users/groups to receive the button, or select Everyone at your organization for all users. Accept the terms of service and click Finish.

4. A prompt will show where users can find the button. For questions, contact support@ninjio.com.
PHISH ALERT Admin Guide
If you have any questions, please reach out to support@ninjio.com.
Comments
0 comments
Please sign in to leave a comment.