Allowlisting Via DMI
The preferred method of allowlisting is through Google's Direct Message Integration.
You can find DMI setup instructions here.
If you prefer to allowlist through bypassing SMTP IPs, please proceed with the next part of this documentation.
You do not need to allowlist SMTP IPs once you have configured the Direct Message Injection.
Allowlisting Via SMTP IP
Part A: Adding IP Addresses to Google Email Allowlist
1. Log in to your Google Admin console.
2. Go to Apps, Google Workspace, then Gmail.
3. Scroll down until you see Spam, Phishing and Malware and select it.
4. In the Email allowlist, enter the NINJIO SMTP IP addresses.
Part B: Adding IP addresses to Google Inbound Gateway.
1. Enable the Inbound gateway and add the IP addresses once more to the
Gateway IPs.
2. Configure the Inbound gateway to match the settings within the
screenshot below then click save.
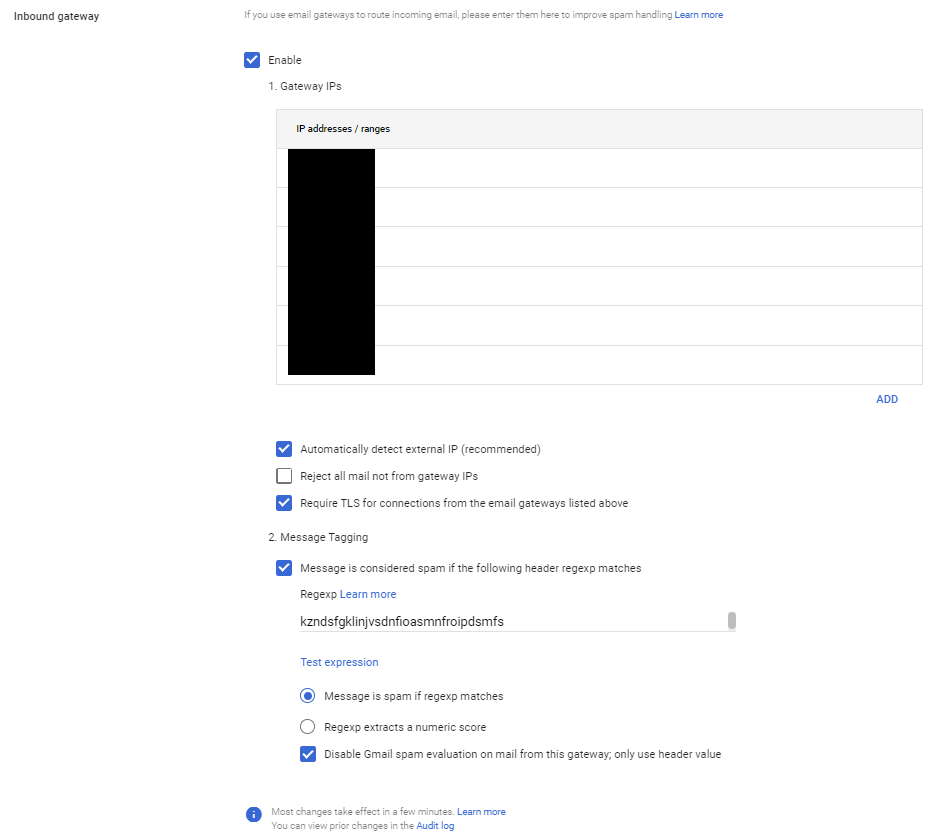
The Regexp can be a long string of random characters.
You can copy the example here:
Kzndsfgklinjvsdnfioasmnfroipdsmfs
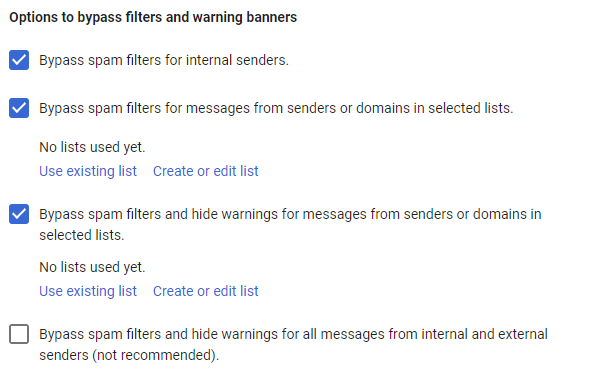
Part C: Creating a Bypass Warnings Rule.
1. In the Spam section, click the Configure button to create a new rule.
2. Name your rule “NINJIO Bypass Warnings”.
3. Check off the boxes in the image below.
4. Click on Create or edit list. You’ll be taken to the Manage address lists page.
5. Click Add address list, name the list “NINJIO domains”, click Bulk add addresses, copy a list of the NINJIO domains, and paste it into the Bulk add address field. If you don't have a list of the NINJIO domains, you can request them here. Leave Require sender authentication checked.
6. Click Save then close the Manage address lists tab.
7. Within the Spam, phishing, and malware tab, Click Create or edit list and add the list of domains you just created.
8. Click Save.
Note: it may take up to 12 hours for policies to go into effect.
Part D : Bypass Spam Filter Google Workspace.
1. For the final step, go to Gmail’s compliance settings.
2. Go to the Content Compliance section and click CONFIGURE or ADD
ANOTHER RULE button.
3. "Add setting" pop-up will appear.
4. Enter a description of the rule: "NINJIO Bypass Spam".
5. Under the Email messages to affect menu, select the Inbound.
6. Under "Add expressions that describe the content you want to search for in each message If ANY of the following match the message", click ADD.
7. On the top of the window, change the Simple Match to Metadata Match option and use the following settings. Change the Attribute to Source IP. Leave the Match Type as Source IP is within the following range. Add the NINJIO IP here. Repeat these steps for each IP.
8. Once you have completed these steps, click Save.
9. Under "If the above expressions match, do the following Modify message", check off Bypass spam filter for this message.
10. Click Save.
Note: It can take up to an hour for any changes to take effect.
Part E (Optional): Allowlisting Email Headers in Google Workspace.
1. To allowlist via the header, go to Gmail’s compliance settings.
2. Go to the Content Compliance section and click CONFIGURE or ADD
ANOTHER RULE button.
3. Add Setting pop-up will appear.
4. Enter a description of the Allowlisting rule.
5. Under the Email messages to affect menu, select the Inbound, Internal Sending, and Internal-Receiving options.
6. Scroll down to Add expressions that describe the content you want to search for in each message. Under this, select If Any of the following matches the message. Then under Expressions, click ADD.
7. On the top of the window, change the Simple Match to Advance Content Match option and use the following settings.
• Location: Full Headers
• Match Type: Contains Text
• Content: (NINJIO's unique Header value [provided during onboarding process])
8. Under, If the above expressions, do the following scroll down to Spam and select: Bypass spam filter for this message. Once you have completed these steps, click Save.
Note: It can take up to an hour for any changes to take effect.
Comments
0 comments
Please sign in to leave a comment.