▶ Click here to view our step-by-step demo
Part A: IP Based Rule Creation (For M365/Exchange)
1. Login to your Exchange Admin Panel.
2. In the Admin Center left hand menu toolbar, click Mail flow > Rules.
3. In the main Rules page, click +Add a rule button > Create a new rule.
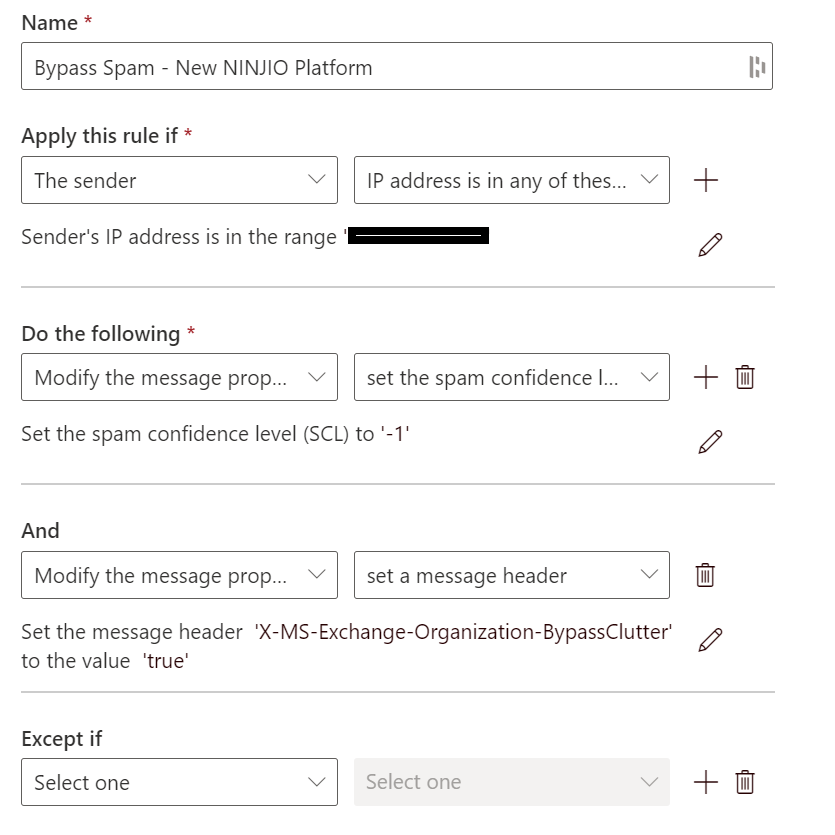
4. In Name section, type "NINJIO IP Allowlisting".
5. In the condition Apply this rule if, choose: The sender > IP address is in any of these ranges or exactly matches.
6. Click the hyperlink: Enter words...
7. Type each of NINJIO's SMTP IP addresses.
8. Under the "Do the following section", click Modify the message properties then select "set spam confidence level" from the drop-down list. Set the spam confidence level to "Bypass Spam Filtering" (-1).
9. Click the plus button (+) to the right of where it says "Do the following", select Modify the message properties from the new drop down list, then select Set a Message Header for the second drop down list.
10. Set the message header: X-MS-Exchange-Organization-BypassClutter
11. Set value as: true.
12. Click Next to be taken to the rule settings, and then click Save.
Note: If you are having trouble allowlisting by IP, we can provision a unique header within the emails we send out!
Part B: Advanced Delivery Policy Configuration (For M365 Cloud)
If you're using our simulated phish program, you may need to whitelist the IP and domains within the Advanced Delivery policy to bypass the M365 quarantine.
1. Go to the Microsoft 365 Defender Advanced Delivery Policies.
2. Click Phishing simulation.
3. Click Edit icon Edit.
4. If there are no configured phishing simulations, click Add.
5. On the Edit third-party phishing simulation flyout that opens, configure the following setting:
Domain: For this section, you will need to add our domains. You can find the most up to date list of domains here.
IP: Expand this setting and enter the dedicated SMTP IPs then press Enter or select the value that is displayed below the box.
Simulation URLs to allow: Leave this area blank.
Once this is completed, please run a test campaign to test the whitelisting.
Note: It may take up to 12 hours for the Policies to update.
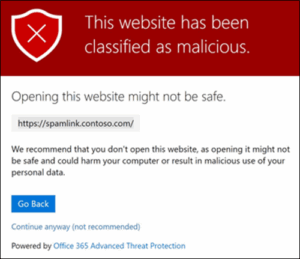
Part C: (Optional) Bypassing Defender Safe links
This step is for users who are not able to bypass Defender with the previous step (Step B). You will see the error message below if this is the case.
1. Go to Exchange Transport Rules
2. In your Mail Flow Rules, click the + button, then click Create a new rule…
3. Create a name for the rule, such as NINJIO – Safe Links Skip
4. Add the condition Apply this rule if…, select The sender, then select IP address is in any of these ranges or exactly matches.
Enter the NINJIO SMTP IP addresses.
5. Under Do the following section, click Modify the message properties, then Set a Message Header.
6. Set the message header:
X-MS-Exchange-Organization-SkipSafeLinksProcessing
Note: the header is case sensitive
7. Set value as 1
8. Click Save
9. Set your new rule to Enabled
Note: It may take up to 12 hours for your policies to apply
Part D: (Optional) Email Connector Configuration for Email Gateways
(For On-Prem Exchange)
1. Go to Mail Flow > Connectors
2. Click + Add a Connector. In Connection From, select Partner Organization. Make sure Connection to: has Office365 selected.
3. Enter a name (Example: NINJIO – Barracuda) and an optional descript Make sure the checkbox to turn on the connector once saved is enabled.
4. In the Authenticating sent email step, select By verifying the IP address of the sending server matches one of the following IP addresses, which belong to your partner organization.
5. In the box, enter the NINJIO SMTP IP addresses.
6. In the next Security restrictions step, select Reject email messages if they aren’t sent over TLS.
7. Click Next and review your settings
8. Once you’re ready to proceed, click Create connector. You’ll get a confirmation message that the connector has been created. Then click Done.
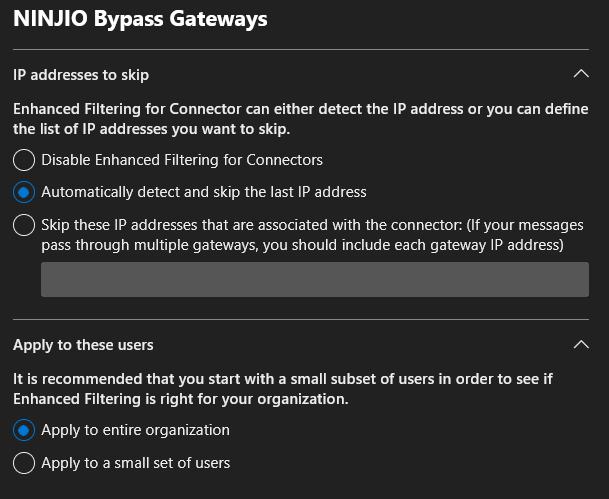
9. If you have Defender, head over to Enhanced Filtering for Connectors. If you do not have Defender, you may skip these last steps.
10. Select your new connector and check "Automatically detect and skip the last IP address" and leave "Apply to entire organization".
11. Click Save.
Note: it may take up to 12 hours for the connector to go into effect
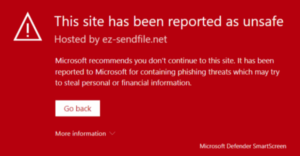
Part E: (Optional) Microsoft Defender Smart Screen Allowlisting
This step is for users who are experiencing a red screen when clicking on the simulated phishing links.
1. Log in to your Microsoft 365 Security Admin Center.
2. On the menu on the left side, please click Settings > Endpoints
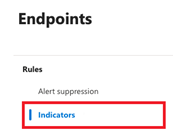
3. Under the Rules section in the sidebar, please select Indicators
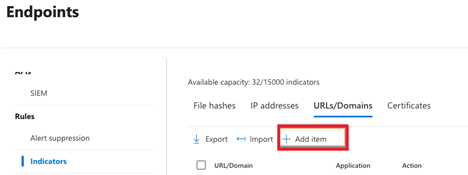
4. Select the URLs/Domains section, then select Add item
5. On the Add Indicator page, please do the following:
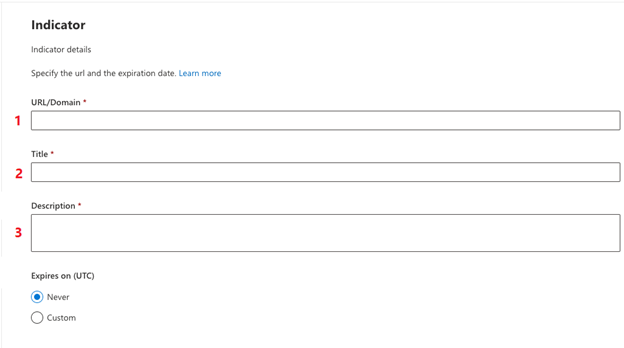
6. Please enter the root domain. This will need to be repeated for each root domain.
7. Please add a title referencing NINJIO; ex: NINJIO Exception – domain name
8. Please add a Description referencing NINJIO; ex: This domain is being allowed for simulated phishing education tests.
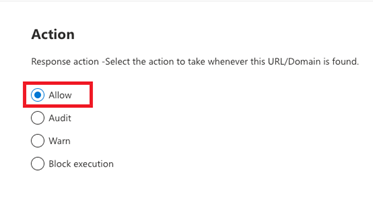
9 Click Next. On the following Action page, please make sure Allow is selected.
10. Click Next. On the Organizational Scope page, please click Next.
11. On the Summary page, please click Submit.
12. Repeat steps 5-8 for each root domain you’d like to use.
You can find the most up to date copy of our domains here.
Comments
0 comments
Please sign in to leave a comment.